Part 2 of Step 9: Renovating Our New-Used Travel Trailer
/This is the DIY used RV to cute RV post. Ugh. I have been putting off writing this post, but the time has come. You, however, are free to avoid reading it.
Fixing up an RV was not a pet project that we completed on the weekends. We picked up our trailer on January 4th. It was 7 degrees out. We hit the road on January 15th. We were limited by time, money, and the weather, but mostly by time. It was so gratifying to see our project take shape, but it was also tons of exhausting work. Hopefully others can learn from our process.

After 4 or 5 loops of the block--trailer is parked at the Metzler's B&B/5 Star Restaurant/Workshop
STEP 1: PICK UP TRAILER: Even if you arrive the moment the dealer opens up, you will not actually leave with your camper until lunch time. You'll need to do the walk through and get your truck all hitched up and sign the papers etc. There was a point where we thought about picking up our trailer on our way out of Chicago—like at the same time as we were moving. That was so dumb of us. We never would have made it.
Collecting the trailer was a full day's affair. Paul's parent's generously hosted and helped us through this project, and their driveway became our workspace. It took us a couple of tries to back the thing into the drive (in our defense, the drive was basically made to deter people from parking 30 foot trailers in front of their homes, thereby sullying the image of the neighborhood). Miraculously, the trailer, the driveway, and our marriage survived this step in the process.
STEP 2: THROW A PARTY. We had people over to drink wine and ogle our new purchase. We called it a “wine and design” party and asked people what we should change. They had all sorts of wacky ideas, and we even used some of them.
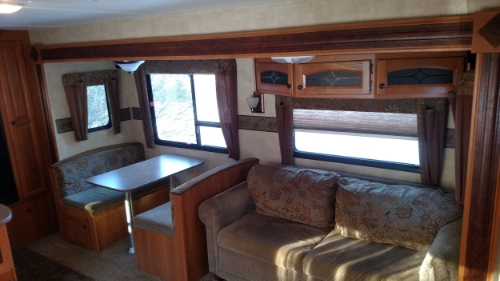
The before of the living room/dining room/slide out
STEP 3: CLEAN EVERYTHING! Since we bought used, the trailer had to be scoured before we made any changes. We vacuumed the blinds. We took off the light fixtures and soaked them. We unhinged the vents and wiped those down too.
Pro tip: It doesn’t really matter what you use to clean. We went with a combination of hot water, vinegar, and murphy’s oil soap, (#muprhysoilsoap,pleasesponsorus) but any cleaning product will do.
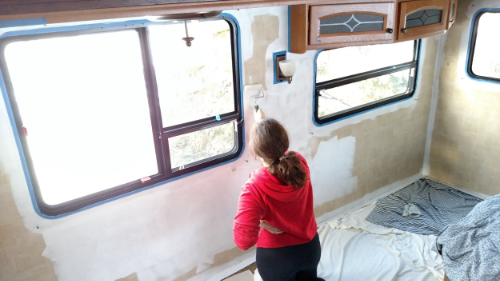
STEP 4: DISMANTLE! We pulled out the dinette and the reading chairs. We unscrewed all the valences (cornices? valences?), any bolt in the wall came out, we tossed the button-on curtains. Who would use buttons on curtains?? We ripped off the wallpaper runner and did our best to scrub all the wallpaper-glue-scum off the walls. Our best was not necessarily perfect and so far the new paint job is holding up.
Another tip: If you’re pulling bolts and boards off the wall that you plan to put back up, make sure you label everything and where it came from! This will save you much time/headaches/marital discourse

Although I loved the look of trailers with freshly painted cabinets, we just didn’t have the time for resurfacing both the walls and the cabinets, thus the faux-wood storage was the only feature that got to remain attached to the wall.
STEP 5. TAPE. Before painting we taped any boundary where paint would end and another surface, begin. We taped the woorwork, the ceiling, the floor, around the cabinets, etc. For a 30 foot by 8 foot space, there sure was a crap ton of taping to be done, but it’s so much easier to tape than it is to get paint off of stuff where you don’t want paint.
Elite pro tip: Find excellent in-laws that are willing to help you with tedious jobs and also make sure you stop occasionally to eat.

STEP 6: PRIME TIME, or just paint, whatever. There are lots of other RV renovators who skipped the priming step and all the best to them. Our walls were sort of a weird vinyl with a rough-hewn paper texture. I was worried that paint wouldn’t take and a quick roll of primer would end that issue.
I think people skip the priming or choose a 2-in-1 paint in an effort to save time, but priming didn’t take us that long. We kept a dehumidifier and the heat running in the trailer while we worked so that everything would dry quickly. The primer lightened the walls enough that we only needed one coat of our color AND the priming gave us a chance to hone in on our paint rolling skills.
Important painting features: the excellent edging, the old sheets/drop cloths
STEP 6.5: CHOOSE A PAINT COLOR. After much deliberation and the opinions of many aesthetically inclined bystanders, we chose a soft blue paint. It was called wind-speed. The name is nearly as important as the pantone itself.
After giving the primer a night to dry out, we painted our living room/dining room slide out and looked back at our work.

Thanks to City Year for the previously paint splotched, gender neutralizing, work pants
We hated it. It was less wind-speed and more, congratulations on the birth of your beautiful, long-lashed son.
There were 15 minutes where I pretended like it was fine and I loved it and it would soften over time. We had spent so many hours running errands and working on a thousand projects and standing next to a dehumidifier while sweating. We were totally exhausted. Was hue unhappiness really important enough to make such a fuss over?
Paul spent those same 15 minutes pretending that he didn’t mind baby-speed blue either. Then—praise the infinite wisdom and clairvoyance of the marriage gods—he voiced our shared thought: the paint color was truly awful. We were not weekending in this thing. We were going to LIVE here. We had to choose another paint.

In this picture: new and old color paint testing (under window and kitchen cabinets), massive to do list on fridge, my arm bundled under 7 layers to keep out the NY chill
STEP 7: LAUGH THE KIND OF WHOLE-BODY LAUGH THAT MAY-AT ANY MOMENT-BECOME CRYING. Do not be alarmed if your laughter/weeping shakes the building. You haven’t quite figured out those trailer stabilizers yet. It’s January in upstate New York and it is freezing out. Maybe it's time to eat a snack.